- AWS
- AWS Training and Certification
- IT Training and Certification
- Linux Training and Certification
- Red Hat
- RedHat Training and Certification
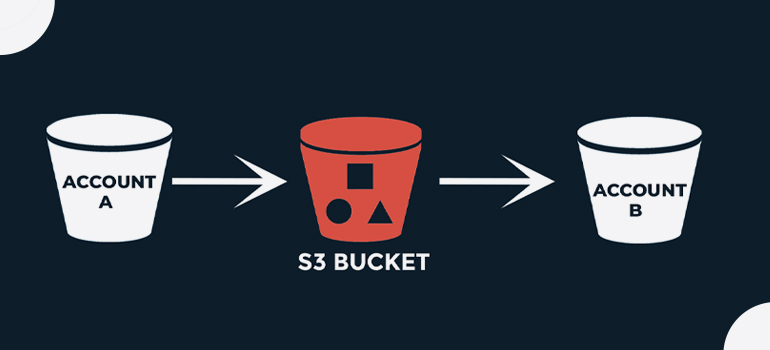
An AWS account—for example, Account A—can grant another AWS account, Account B, permission to access its resources such as buckets and objects. Account B can then delegate those permissions to users in its account. In this example scenario, a bucket owner grants cross-account permission to another account to perform a specific bucket operation
This article helps you navigate this minefield, with details not only of how the S3 permissions work but also of how you can implement some common real-world scenarios such as S3 bucket access from another AWS account.
- Account A administrator user attaches a bucket policy granting cross-account permissions to Account B to perform specific bucket operations. Note that the administrator user in Account B will automatically inherit the permissions.
- Account B administrator user attaches user policy to the user delegating the permissions it received from Account A
- The user in Account B then verifies permissions by accessing an object in the bucket owned by Account A.
First, we need to create an s3 Bucket steps are given below:
Step 1: Log on to your AWS Console
Step 2: go to the Search bar ” S3 services

Step 3: Click on S3 Scalable Storage in the Cloud” and proceed further
Step 4: Create a new Bucket
In the general configuration category:
Step 5: Enter the bucket name (cross-account bucket )
Step 6: Next, choose the AWS region, [Asia Pacific (Mumbai) ap-south-1].
ACLs disabled (Recommended)
Bucket owner enforced – Bucket and object ACLs are disabled, and you, as the bucket owner, automatically own and have full control over every object in the bucket. Access control for your bucket and the objects in it is based on policies such as AWS Identity and Access Management (IAM) user policies and S3 bucket policies Objects can be uploaded to your bucket only if they don t specify an ACL or if they use the bucket-owner-full-control canned ACL.
Block Public Access settings for this bucket
Public access is granted to buckets and objects through access control lists (ACLs), bucket policies, access point policies, or all. In order to ensure that public access to this bucket and its objects is blocked, turn on Block all public access. These settings apply only to this bucket and its access points. AWS recommends that you turn on Block all public access, but before applying any of these settings, ensure that your applications will work correctly without public access. If you require some level of public access to this bucket or objects within, you can customize the individual settings below to suit your specific storage use cases
Bucket Versioning
Versioning is a means of keeping multiple variants of an object in the same bucket. You can use versioning to preserve, retrieve, and restore every version of every object stored in your Amazon S3 bucket. With versioning, you can easily recover from both unintended user actions and application failures.
Disable
( choose the Disable )
The default encryption configuration of an S3 bucket is always enabled and is at a minimum set to server-side encryption with Amazon S3-managed keys (SSE-S3). With server-side encryption, Amazon S3 encrypts an object before saving it to disk and decrypts it when you download the object. Encryption doesn’t change the way that you access data as an authorized user. It only further protects your data. You can configure default encryption for a bucket. You can use either server-side encryption with Amazon S3 managed keys (SSE-S3) (the default) or server-side encryption with AWS Key Management Service (AWS KMS) keys (SSE-KMS).
Amazon S3 managed keys (SSE-S3)
Bucket Key = Enabel
Step 7: Click on Create Bucket.
If the bucket is created successfully, you will see a message like this on the top of the page:

Step 8: click bucket name
Step 9: Go to the Permissions tab.
Step 10: Bucket policy
The bucket policy, written in JSON, provides access to the objects stored in the bucket. Bucket policies don’t apply to objects owned by other accounts
and click Edit
Policy generator
Step 1: Select Policy Type
A Policy is a container for permissions. The different types of policies you can create are an IAM Policy, an S3 Bucket Policy, an SNS Topic Policy, a VPC Endpoint Policy, and an SQS Queue Policy.
S3 bucket policy
Add Statement(s)
Step 2: Add Statement(s)
A statement is the formal description of a single permission. See a description of elements that you can use in statements.
Step 3: Principal = arn:aws:iam::ACCOUNT-B-ID:root
Step 4: Actions = GetObject , ListBucket , PutObject
Step 5:
Step 6: Click [ Add statement ]
Create the same again as above but put /* on bucket ARN
Step 1: Select Policy Type
A Policy is a container for permissions. The different types of policies you can create are an IAM Policy, an S3 Bucket Policy, an SNS Topic Policy, a VPC Endpoint Policy, and an SQS Queue Policy.
Add Statement(s)
Step 2: Add Statement(s)
A statement is the formal description of a single permission. See a description of elements that you can use in statements.
Step 3: Principal = arn:aws:iam::ACCOUNT-B-ID:root
Step 4: Actions = GetObject , ListBucket , PutObject
Step 5:
Step 6: Generate Policy

Copy policy
Go to Policy generator
past policy
 {
   "Version": "2012-10-17",
   "Id": "Policy1683696444814",
   "Statement": [
     {
        "Sid": "Stmt1683696418840",
        "Effect": "Allow",
        "Principal": {
          "AWS": "arn:aws:iam::Account-B-id :root"
        },
        "Action": "s3:*",
        "Resource": "arn:aws:s3:::cruse-account-s3-buckee"
     },
     {
       "Sid": "Stmt1683696442588",
       "Effect": "Allow",
       "Principal": {
         "AWS": "arn:aws:iam::Account-B-id:root"
       },
       "Action": "s3:*",
       "Resource": "arn:aws:s3:::cruse-account-s3-buckee/*"
      }
    ]
  }
After that, we have to log in to Aws Account ( B ).
Step 1: Now open a new tab and open AWS Policy Generator
https://awspolicygen.s3.amazonaws.com/policygen.
4: Click [ Add statement ]

Copy policy,
{
  "Version": "2012-10-17",
  "Statement": [
    {
      "Sid": "Stmt1683701367955",
      "Action": [
        "s3:GetObject",
        "s3:ListBucket",
        "s3:PutObject"
      ],
      "Effect": "Allow",
      "Resource": "arn:aws:s3:::cruse-account-s3-buckee"
    },
    {
      "Sid": "Stmt1683701399477",
      "Action": [
        "s3:GetObject",
        "s3:ListBucket",
        "s3:PutObject"
      ],
      "Effect": "Allow",
      "Resource": "arn:aws:s3:::cruse-account-s3-buckee"
    }
  ]
}
Step 2: Navigate to the IAM Dashboard by clicking on the “Services” dropdown menu, selecting “SecuritNy, Identity, & Compliance,” and then clicking on “IAM.”

Step 2: Click on “Policies” in the left-hand menu and then click on the “Create policy” button.
Step 3: After generating paste it into Identity and Access Management (IAM) | Click on
Policy | Click on Create Policy | Click on JSON | Click on Create Policy

Click next
Step 4: file policy name = cruse-account-policy
Click Create policy

Security credentials
Step 1: Access keys (1)Use access keys to send programmatic calls to AWS from the AWS CLI, AWS Tools for PowerShell, AWS SDKs, or direct AWS API calls. You can have a maximum of two access keys (active or inactive) at a time. Learn more
Step 2: Click create access key
Continue to create access key?
Next, click Create Access Key

Download AWS CLI

Install and update requirements
- We support the AWS CLI on Microsoft-supported versions of 64-bit Windows.
- Admin rights to install software
Install or update the AWS CLI
To update your current installation of AWS CLI on Windows, download a new installer each time you update to overwrite previous versions. AWS CLI is updated regularly. To see when the latest version was released, see the AWS CLI version 2 Changelog on GitHub.
Step 1: Download and run the AWS CLI MSI installer for Windows (64-bit):
https://awscli.amazonaws.com/AWSCLIV2.msi
Step 2 : Alternatively, you can run the msiexec command to run the MSI installer.
C:\> msiexec.exe /i https://awscli.amazonaws.com/AWSCLIV2.msiStep 3: For various parameters that can be used, see msiexec on the Microsoft Docs website. For example, you can use the /qn flag for a silent installation.
C:\> msiexec.exe /i https://awscli.amazonaws.com/AWSCLIV2.msi /qnStep 4: To confirm the installation, open the Start menu, search for cmd to open a command prompt window, and at the command prompt use the aws –version command.
C:\> aws --version
aws-cli/2.10.0 Python/3.11.2 Windows/10 exe/AMD64 prompt/off
If Windows is unable to find the program, you might need to close and reopen the command prompt window to refresh the path or follow the troubleshooting in Troubleshooting AWS CLI errors.

Step 1: AWS Config
command = aws configure
Step 2: Aws access key [None]
Access key ID
Step 3: Aws secret access key [None]
Secret access key
Step 4: Default region name [None]:
Inter
Step 5: Default output format [None]:
Inter
command aws s3 ls s3://cruse-account-s3-buckee
Step 7: Download the s3 bucket files
aws s3 cp "s3://cruse-account-s3-buckee/ aws bsnner.jpg" .

